In this hands-on tutorial, we will build a complete Azure SQL Server + SQL Database using Terraform, then securely connect to it from our local machine and run real SQL commands — without installing SSMS or Azure Data Studio.
In this mini project, we implement Azure governance using Terraform. The goal is to enforce organizational standards at the subscription level using Azure Policy—so that resources follow rules for:
Mandatory tags
Allowed VM sizes
Allowed deployment locations
Everything is automated using Terraform infrastructure as code.
Step 1 – Create Resource Group and Base Terraform Setup
We start by creating:
A resource group
Variables for locations, VM sizes, and allowed tags
✔ Resources in other regions → denied ✔ Standardized deployment geography
Final Outcome of This Mini Project
Using Terraform + Azure Policy we achieved:
✔ Mandatory tagging for all resources ✔ Standard VM sizes enforced ✔ Controlled allowed regions ✔ Governance at subscription level ✔ Fully automated with IaC
In this post, I’ll walk you through a complete, working mini project where we deploy an Azure Linux Function App using Terraform and then deploy a Node.js QR Code Generator function using Azure Functions Core Tools.
This is not just theory — this is exactly what I built, debugged, fixed, and verified end-to-end. I’ll also call out the gotchas I hit (especially in Step 2), so you don’t lose hours troubleshooting the same issues.
Azure Functions Core Tools deploy code from the current directory
Missing npm install causes runtime failures
Blob Storage integration works end-to-end
Azure Functions can be tested via simple HTTP requests
🧠 Final Notes
Warnings about extension bundle versions were intentionally ignored
This demo focuses on learning Terraform + Azure Functions, not production hardening
In real projects, code deployment is usually handled via CI/CD pipelines
🎯 Conclusion
This mini project demonstrates how Infrastructure as Code (Terraform) and Serverless (Azure Functions) work together in a practical, real-world scenario.
If you can build and debug this, you’re well on your way to mastering Azure + Terraform.
Blue-green deployment is a release strategy that lets you ship new versions of your app with near-zero downtime and low risk. Instead of updating your live app directly, you run two environments side-by-side and switch traffic between them.
In this guide, I’ll walk you through how I implemented blue-green deployment on Azure using Terraform and simple HTML apps. This is written for beginners and focuses on understanding why we do each step — not just what to type.
🧠 What Is Blue-Green Deployment (Simple Explanation)
Imagine:
Blue = current live version
Green = new version
Users only see one version at a time.
You:
Deploy the new version to Green
Test it safely
Swap Green → Production
Instantly roll back if needed
No downtime. No risky in-place updates.
Azure App Service deployment slots make this easy.
🎯 What We Will Build
We will:
✅ Create Azure infrastructure with Terraform ✅ Create a staging slot ✅ Deploy two app versions (Blue & Green) ✅ Swap them using Terraform ✅ Understand how real companies do this
📌 Prerequisites
You should have:
Azure subscription
Terraform (by HashiCorp) installed
Azure CLI installed
Logged in using az login
Basic Terraform knowledge
🏗️ Step 1 — Create Resource Group, App Service Plan & App Service
Why these resources?
Resource Group Container that holds everything.
App Service Plan Defines pricing tier, performance, and features. Deployment slots require Standard tier or higher.
Terraform + Azure Entra ID Mini Project: Step-by-Step Beginner Guide (Users & Groups from CSV)
In this mini project, I automated user and group management in Microsoft Entra ID using Terraform.
Instead of creating infrastructure like VMs or VNets, we manage:
👤 Users
👥 Groups
🔗 Group memberships
I followed my instructor’s tutorial but implemented it in my own small, testable steps. This blog shows exactly how you can do the same and debug easily as a beginner.
🎯 What We’re Building
We will:
✅ Fetch our tenant domain ✅ Read users from a CSV file ✅ Create Entra ID users from CSV ✅ Detect duplicate usernames ✅ Create a group ✅ Add users to the group based on department
In this mini project, I implemented Azure VNet peering using Terraform, but instead of applying everything at once, I deliberately broke the setup into small, testable steps. This approach makes it much easier to understand what’s happening, catch mistakes early, and build real confidence with Terraform and Azure networking.
Below is the exact flow I followed — and you can follow the same steps as a beginner.
This mini project demonstrates how to build a real-world Azure infrastructure step by step using Terraform. The goal is not just to deploy resources, but to understand why each Azure service exists, how it fits into the architecture, and what each Terraform block actually does.
Instead of creating everything in one go, we intentionally build the infrastructure incrementally. This makes it easier for beginners to:
Verify resources in the Azure Portal
Understand dependencies between services
Debug errors without feeling overwhelmed
Build a strong mental model of Azure networking and compute
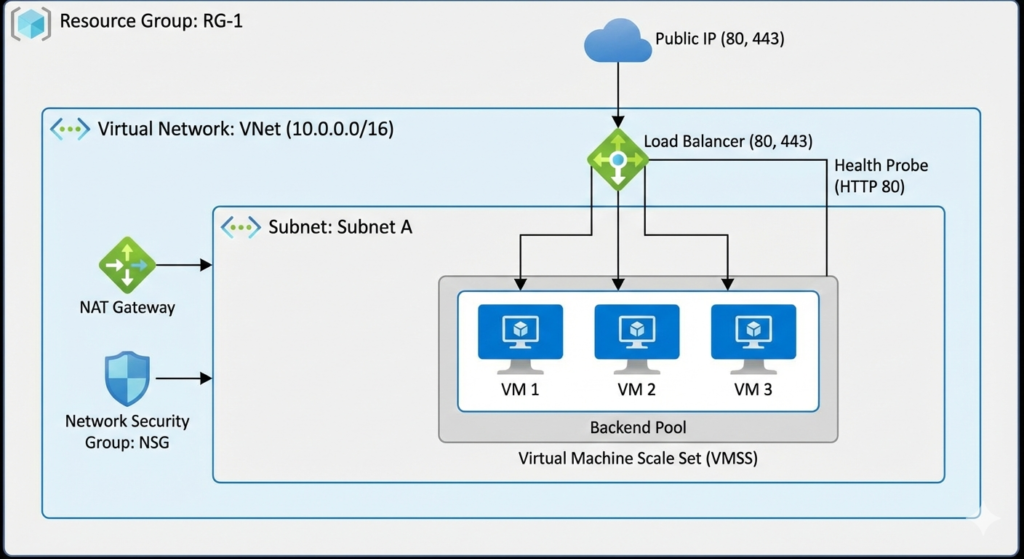
What We Are Building (End Architecture Overview)
By the end of this project, we will have:
A Resource Group to logically contain all resources
A Virtual Network (VNet) with a defined private IP space
A Subnet to host compute resources
A Network Security Group (NSG) acting as a firewall
A Public IP for inbound internet access
A Standard Load Balancer to distribute traffic
A NAT Gateway to manage outbound internet traffic
A Virtual Machine Scale Set (VMSS) running a web application
This architecture closely resembles how production web applications are deployed on Azure.
Step 1: Resource Group, Virtual Network, and Subnet
Why this step is required
In Azure, nothing can exist without a Resource Group. Similarly, no virtual machine can exist outside a Virtual Network.
This step lays the networking foundation for everything that follows.
Terraform Built-in Functions (Part 1): Learning Functions Through Hands-on Assignments
In this section, we begin exploring Terraform built-in functions through practical, hands-on assignments. Instead of only reading documentation, the focus here is on:
Practicing functions directly in terraform console
Applying them in real Terraform files
Solving common problems such as:
Formatting names
Enforcing naming rules
Merging maps
Validating resource constraints
Generating dynamic values
This approach helps beginners understand why functions exist and how to use them correctly.
Practicing Functions Using terraform console
Before writing full Terraform files, we can experiment with functions interactively.
terraform console
Inside the console, you can directly test functions.
Example:
max(2, 4, 1)
Result:
4
This shows:
You do not need to write a full Terraform file
You can quickly test function behavior
This is the fastest way to learn functions safely
Terraform only supports built-in functions. You cannot create custom functions in Terraform.
Assignment 1: Formatting Resource Names with lower and replace
Requirement:
Resource names must:
Be lowercase
Replace spaces with hyphens
Input example:
Project Alpha Resource
Expected output:
project-alpha-resource
Step 1: Define the Variable
variable "project_name" {
  type        = string
  description = "Name of the project"
  default     = "Project Alpha Resource"
}
Step 3: Build a Map of NSG Rules Using a for Expression
locals {
  nsg_rules = {
    for port in local.formatted_ports :
    "Port-${port}" => {
      name        = "Port-${port}"
      port        = port
      description = "Allow traffic on port ${port}"
    }
  }
}
Explanation:
for port in local.formatted_ports Loops through each port
In this first part of Terraform functions, you learned how to:
Practice functions using terraform console
Format names using:
lower
replace
substr
Merge maps using:
merge
Enforce provider naming rules using nested functions
Convert strings to lists using:
split
Generate multiple blocks using:
for expressions
Dynamic maps
These assignments show how Terraform functions help you write:
Cleaner code
Fewer hardcoded values
More reusable configurations
Provider-compliant resource definitions
This forms the foundation for writing dynamic, production-ready Terraform code.
Terraform Built-in Functions (Part 2): Practical Demos with Lookup, Validation, Sets, Math, Time, and Files
In this section, we continue learning Terraform built-in functions through a set of hands-on assignments. The focus here is on how functions are used in real Terraform code to solve practical problems such as:
Selecting values dynamically
Validating user input
Enforcing naming rules
Removing duplicates
Performing math on lists
Working with timestamps
Handling sensitive data and files
All examples below are written in a beginner-friendly, step-by-step way.
Using lookup to Select Values from an Environment Map
Instead of writing long conditional expressions, we use a map + lookup function to select the correct VM size based on the environment.
Defining the Environment Variable with Validation
variable "environment" {
  type        = string
  description = "Environment name"

  validation {
    condition     = contains(["dev", "staging", "prod"], var.environment)
    error_message = "Enter a valid value for environment: dev, staging, or prod"
  }
}
Explanation:
contains(["dev", "staging", "prod"], var.environment) Ensures the value is only one of the allowed environments
If the value is invalid, Terraform stops with the custom error message
This prevents accidental typos like prods or testing.
Mapping Environments to VM Sizes
variable "vm_sizes" {
  type = map(string)
  default = {
    dev     = "Standard_D2s_v3"
    staging = "Standard_D4s_v3"
    prod    = "Standard_D8s_v3"
  }
}
This map defines which VM size should be used in each environment.
output "credential" {
  value     = var.credential
  sensitive = true
}
Terraform will display:
credential = <sensitive>
This prevents secrets from being printed in logs.
Enforcing Naming Rules with endswith
We ensure backup names end with _backup.
variable "backup_name" {
  type    = string
  default = "test_backup"

  validation {
    condition     = endswith(var.backup_name, "_backup")
    error_message = "Backup name must end with _backup"
  }
}
If the name does not end with _backup, Terraform stops with an error.
Combining Lists and Removing Duplicates with concat and toset
Terraform File and Directory Structure Best Practices
As your Terraform projects grow, keeping everything in a single file becomes messy and hard to maintain. In this section, we’ll learn how to structure Terraform files properly and how Terraform decides the order in which resources are created using dependencies.
This will help you write clean, scalable, and error-free Terraform code.
Splitting Terraform Code into Multiple Files
Terraform allows you to split your configuration into multiple .tf files.
✔ You can move each block (provider, resources, variables, outputs, etc.) into different files ✔ Terraform automatically loads all .tf files in a directory ✔ File names can be anything meaningful
Example of a Clean File Structure
You might organize your project like this:
main.tf → main resources
providers.tf → provider configuration
variables.tf → input variables
outputs.tf → output variables
locals.tf → local variables
backend.tf → backend configuration
⚠️ Important: File names don’t control execution order — dependencies do.
Some Blocks Must Be Inside Parent Blocks
Certain Terraform configurations must be nested inside parent blocks, such as the backend.
depends_on = [ azurerm_resource_group.example ] Forces Terraform to create the resource group first Even if Terraform wouldn’t detect the dependency automatically
⚠️ Use explicit dependency only when necessary — implicit is preferred.
Best Practices Summary
To keep your Terraform projects clean and reliable:
✔ Split code into meaningful files ✔ Don’t rely on file name order for execution ✔ Always use resource references to create implicit dependencies ✔ Use depends_on only when required ✔ Keep backend configuration inside the terraform block ✔ Organize directories logically as projects grow
Terraform Type Constraints Explained (Through an Azure VM Example)
In this section, we’ll understand Terraform Type Constraints by actually creating an Azure Virtual Machine step by step. Instead of theory alone, we’ll see how each data type is used in real Terraform code.
We’ll cover:
Primitive types: string, number, bool
Collection types: list, map, set
Structural types: tuple, object
Starting Point: Azure VM Terraform Documentation
To understand which fields expect which types, we first look at the official Azure VM resource documentation:
# azurerm_network_interface.main will be created
# azurerm_resource_group.example will be created
# azurerm_subnet.internal will be created
# azurerm_virtual_machine.main will be created
# azurerm_virtual_network.main will be created
This confirms Terraform is reading your types correctly.
List Type (Collection Type)
A list holds multiple values of the same type, in a fixed order.
var.vm_config.publisher Accesses the publisher field from the object
Same pattern for offer, sku, and version
This keeps VM image configuration clean and centralized.
Summary
In this section, you learned how Terraform type constraints work by using:
string → resource names and prefixes
number → disk size
bool → delete OS disk flag
list(string) → multiple locations
map(string) → tags
tuple(...) → mixed network configuration
set(string) → unique VM sizes
object({...}) → structured VM configuration
Understanding these types is essential to avoid type mismatch errors and to write robust, reusable Terraform code.
Terraform Resource Meta-Arguments: count and for_each
In this section, we’ll learn about Terraform Resource Meta-Arguments, specifically:
count
for_each
These meta-arguments allow you to create multiple resources in a loop using collections like lists, sets, and maps.
We’ll use a practical example: creating multiple Azure Storage Accounts, and we’ll also see how to output the names of created resources, which is a very common real-world requirement.
Why Meta-Arguments Are Needed
Without count or for_each, you would have to:
Write one resource block per storage account
Duplicate the same code again and again
With meta-arguments, you can:
Write the resource once
Dynamically create many instances
Control creation using variables
This makes your Terraform code:
Cleaner
More scalable
Easier to maintain
Using count to Create Multiple Resources
count is best suited when:
You are working with a list
The order of items matters
You want to access elements using an index
Defining a List of Storage Account Names
variable "storage_account_names" {
  type        = list(string)
  description = "storage account names for creation"
  default     = ["myteststorageacc222j22", "myteststorageacc444l44"]
}
Line-by-line Explanation
type = list(string) Declares a list where every element must be a string
default = [ ... ] Defines two storage account names in a fixed order
No changes occur, but the resource is now protected.
Step 3: Try to Destroy the Resource
Now attempt to destroy the infrastructure:
terraform destroy
Terraform will fail with an error similar to:
Error: Instance cannot be destroyed
Resource azurerm_storage_account.example has lifecycle.prevent_destroy set,
but the plan calls for this resource to be destroyed.
What This Shows
Terraform is telling you:
This resource is marked as non-destructible
The operation is blocked
Nothing will be deleted
This proves that prevent_destroy is working.
Step 4: How to Intentionally Destroy a Protected Resource
To destroy a resource with prevent_destroy, you must explicitly remove the protection first.
Remove the lifecycle block:
lifecycle {
  prevent_destroy = true
}
Run:
terraform apply
Then run:
terraform destroy
Only now will Terraform allow the resource to be deleted.
This ensures:
Deletion is always a conscious, intentional action
Important Rules About prevent_destroy
It blocks:
terraform destroy
Replacements that require destroy
Deletions caused by config changes
It does not block:
In-place updates
Reading the resource
Drift detection
It applies only to Terraform actions
It does not prevent manual deletion in the Azure Portal
When Not to Use prevent_destroy
Avoid using it when:
The resource is temporary
You use frequent tear-down environments (dev, test)
You rely on automated cleanup pipelines
Overusing prevent_destroy can:
Block automation
Cause stuck pipelines
Require manual intervention
Use it only for truly critical resources.
Summary
In this section, you learned:
What prevent_destroy does
Why it is essential for protecting critical infrastructure
How Terraform behaves without it
How to demo it by:
Adding prevent_destroy
Running terraform destroy
Observing the blocked operation
How to safely remove the protection when deletion is required
This lifecycle rule is Terraform’s strongest safety mechanism for preventing catastrophic accidental deletions in production environments.
Terraform Lifecycle replace_triggered_by: What It Is and How to Demo It
In this section, we’ll learn about the Terraform lifecycle rule replace_triggered_by:
What it does
Why it exists
When you should use it
How to demo it clearly using Azure
This rule is used when you want Terraform to force replacement of a resource when some other resource or attribute changes.
What Is replace_triggered_by?
By default, Terraform replaces a resource only when:
One of its own attributes changes
And that change requires replacement
The lifecycle rule:
lifecycle {
  replace_triggered_by = [ ... ]
}
Tells Terraform:
“If this other resource or attribute changes, then recreate this resource as well, even if this resource itself did not change.”
In simple words:
You define a trigger
When the trigger changes
Terraform forces replacement of this resource
Why replace_triggered_by Is Important
You should use replace_triggered_by when:
One resource is tightly coupled to another
An in-place update is not safe
You want to guarantee a fresh recreation
Common real-world examples:
Recreate a VM when its image version changes
Recreate an app when a config file changes
Recreate a resource when a subnet changes
Recreate a resource when a secret or key changes
In short:
It gives you explicit control over replacement behavior.
How to Demo replace_triggered_by
We will demo this using:
One Azure Resource Group
One Azure Storage Account
One simple trigger resource
We will:
Create the resources
Link them using replace_triggered_by
Change only the trigger
Observe that Terraform replaces the storage account
Now add a custom condition to the storage account.
resource "azurerm_storage_account" "example" {
  name                     = "democonditionacc01"
  resource_group_name      = azurerm_resource_group.example.name
  location                 = azurerm_resource_group.example.location
  account_tier             = "Standard"
  account_replication_type = "LRS"

  lifecycle {
    precondition {
      condition     = startswith(self.name, "demo")
      error_message = "Storage account name must start with 'demo'."
    }
  }
}
Line-by-line Explanation
lifecycle { ... } Declares lifecycle rules for this resource
precondition { ... } Defines a validation rule that runs before creation or update
condition = startswith(self.name, "demo") Checks that the storage account name begins with "demo"
error_message = "..." Message shown if the condition fails
Apply again:
terraform apply
No change occurs, because the condition is satisfied.
Step 3: Break the Condition Intentionally
Now change the name to an invalid value:
name = "invalidacc01"
Run:
terraform plan
You will see an error like:
Error: Resource precondition failed

Storage account name must start with 'demo'.
What This Shows
This proves that:
Terraform evaluated the condition
The condition returned false
Terraform stopped before creating or modifying anything
This is the core power of custom conditions.
Demo Using postcondition
Now let’s see a simple postcondition.
We will check that the storage account location is really "West Europe".
resource "azurerm_storage_account" "example" {
  name                     = "democonditionacc01"
  resource_group_name      = azurerm_resource_group.example.name
  location                 = azurerm_resource_group.example.location
  account_tier             = "Standard"
  account_replication_type = "LRS"

  lifecycle {
    postcondition {
      condition     = self.location == "West Europe"
      error_message = "Storage account was not created in West Europe."
    }
  }
}
What This Does
Terraform creates or reads the resource
Then checks the condition
If the actual location is not "West Europe", Terraform fails
This validates the real result, not just the input.
Where Else Can You Use Custom Conditions?
You can use custom conditions in:
resource blocks
data blocks
output blocks
Example on output:
output "storage_account_name" {
  value = azurerm_storage_account.example.name

  precondition {
    condition     = length(self) > 3
    error_message = "Storage account name is too short."
  }
}
This validates outputs before showing them.
Important Rules About Custom Conditions
They fail the plan or apply immediately
They do not fix problems, only detect them
They improve safety, not automation
Overuse can make configs too strict
They should contain clear error messages
When Not to Use Custom Conditions
Avoid using them when:
The rule is already enforced by the provider
The rule is too flexible to express in code
You want to allow experimentation in dev
Use them mainly for:
Production guardrails
Organizational policies
Hard technical requirements
Summary
In this section, you learned:
What custom conditions are
The difference between precondition and postcondition
Why they are important for safe Terraform code
How to demo them by:
Adding a precondition
Breaking the rule intentionally
Observing Terraform fail with a custom error
How to validate real infrastructure using postcondition
Custom conditions turn Terraform from a simple provisioning tool into a rule-enforcing, self-validating infrastructure platform.
Terraform Dynamic Expressions: Why We Need Dynamic Blocks and How They Work with Azure NSG
In this section, we’ll understand why Terraform dynamic blocks are needed, how NSG rules look without dynamic blocks, and why in this demo we store rule values in locals and use them inside a dynamic block instead of looping through a simple list.
This explanation is based on your exact Azure Network Security Group demo code.
Official documentation for Azure NSG using terraform:
Why This Design Is Better Than Without Dynamic Blocks
With locals + dynamic blocks:
Resource code stays constant
Rules are data-driven
Easy to extend and modify
Ideal for modules and production use
Clean separation of:
Configuration data
Resource logic
Without dynamic blocks:
Code grows quickly
Hard to maintain
High chance of mistakes
Poor scalability
Summary
In this section, you learned:
How NSG rules look without dynamic blocks
Why hardcoding repeated security_rule blocks does not scale
Why dynamic blocks are needed for repeated nested blocks
Why storing rules in locals as a map is better than:
Hardcoding
Using simple lists
How security_rule.key and security_rule.value work
How Terraform converts data into real configuration
This pattern — maps in locals + dynamic blocks in resources — is a key step from basic Terraform to clean, scalable, production-grade Infrastructure as Code.
Terraform Conditional Expressions: Dynamically Naming an NSG Based on Environment
In this section, we’ll learn how to use a Terraform conditional expression to dynamically set the name of an Azure Network Security Group (NSG) based on the value of an environment variable.
This is a practical beginner example that shows how:
One Terraform codebase
Can create different resource names
For different environments like dev and staging
Without changing the code itself
We’ll explain this using the exact code and CLI output from your demo.
The Problem We Are Solving
In real projects, you rarely deploy only one environment.
You usually have:
Development (dev)
Staging (staging)
Testing (test)
Production (prod)
Each environment must have:
Different resource names
To avoid conflicts
To keep environments isolated
Without conditional logic, you would need:
Separate Terraform files per environment, or
Manual edits before every deployment
Terraform conditional expressions solve this cleanly.
This is a simple but very powerful example of how Terraform conditional expressions make your infrastructure flexible, automated, and production-ready.
Terraform Splat Expression: Collecting Values from Multiple Resources
In this section, we’ll learn about the Terraform splat expression and how it is used to collect values from multiple instances of a resource into a single list.
We’ll cover:
What a splat expression is
Why splat expressions are needed
When you typically use them
The syntax of splat expressions
A simple demo with multiple resources
How this is commonly used with count and for_each
Splat expressions are a key concept when you start working with multiple resource instances in Terraform.
What Is a Splat Expression?
A splat expression is a shortcut syntax used to:
Extract the same attribute From all instances of a resource And return them as a list.
Basic syntax:
resource_type.resource_name[*].attribute
Example:
azurerm_storage_account.example[*].name
This means:
Take all instances of azurerm_storage_account.example
Get the name attribute from each one
Return a list of names
Why We Need Splat Expressions
Splat expressions are useful when:
You create multiple resources using:
count
for_each
You want to:
Output all names
Pass all IDs to another resource
Collect all IP addresses
Build a list from many instances
Without splat:
You would have to reference each instance manually:
Why splat expressions are needed to collect values
How splat works with:
count
for_each
How to use splat in output variables
The difference between:
Legacy *. syntax
Modern [*] syntax
Splat expressions are one of the most important tools for working with multiple resource instances and building data flows between Terraform resources.
Terraform Built-in Functions: Useful String, List & Map Helpers
Terraform comes with a set of built-in functions you can use inside expressions to transform values, manipulate strings, work with lists or maps, and more. These functions are extremely helpful when you want to process values dynamically in a module, variable, local, or resource attribute.