Table of Contents
- 🎯 What You’ll Learn in This Blog
- 📘 Understanding Azure Virtual Network: Your Gateway to Secure Cloud Architecture
- 🏘️ Virtual Network as a Gated Community – Simple Analogy
- 🔢 IP Address and CIDR Notation Explained
- 🧩 VNet vs Subnet
- 🛠️ Creating VNets in Azure
- 🖥️ Adding a Virtual Machine to a VNet
- 🌍 Public IP vs Private IP
- 🤔 Why Do We Need Azure Virtual Network?
- ✅ Final Thoughts
🎯 What You’ll Learn in This Blog
In this blog, we will:
- Understand why Azure Virtual Network (VNet) is required in cloud environments
- Learn how VNets provide isolation and security on shared Azure infrastructure
- Use a simple gated community analogy to visualize networking concepts
- Understand IP addressing and CIDR notation
- Explore the difference between VNet and Subnet
- See how to create VNets and attach Virtual Machines
- Understand Public IP vs Private IP and real-world security best practices
By the end, you’ll clearly understand how Azure networking protects your resources and how traffic flows inside the cloud 🚀.
📘 Understanding Azure Virtual Network: Your Gateway to Secure Cloud Architecture
Azure resources such as Virtual Machines, databases, and applications run on shared physical servers. That means multiple organizations may be using the same underlying hardware.
👉 So how does Azure keep your environment separate and secure?
This is where Azure Virtual Network (VNet) comes in.
VNets create a logically isolated network for your subscription so that:
- Your data is separated from other organizations
- Communication between your resources stays private
- You can fully control inbound and outbound traffic
🔐 Key Idea:
Even though the hardware is shared, VNet ensures your network behaves like your own private data center.
🏘️ Virtual Network as a Gated Community – Simple Analogy
Let’s simplify Azure networking with a real-life example.
Imagine a gated housing community:
- 🏡 Entire community → Virtual Network (VNet)
- 🧱 Boundary wall → Firewall
- 🏢 Buildings → Subnets
- 🏠 Apartments → Virtual Machines (VMs)
- 👮 Main security guard → Application Gateway / Load Balancer
- 🔑 Buzzer system → Network Security Group (NSG)
What does the main security guard do?
The Application Gateway or Load Balancer performs three major tasks:
- ✅ Check ID – Authenticate & authorize traffic
- ✅ Check availability – Is the destination healthy?
- ✅ Find alternative – Route to another VM if needed
Each building (subnet) can also have its own security system—just like an NSG that filters traffic at subnet or VM level.
🧠 Analogy Summary
VNet = Community
Subnet = Building
VM = Apartment
NSG = Door security
Gateway = Main entrance guard
🔢 IP Address and CIDR Notation Explained
Whenever we create a VNet or subnet, we must define an IP address range.
IPv4 Basics
An IPv4 address looks like:
97.87.3.1
- It has 4 parts
- Each part = 8 bits
- Value ranges from 0 to 255 (because 2⁸ = 256)
📐 What is CIDR Notation?
CIDR notation defines how big a network is.
Example:
👉 100.8.0.0/24
/24→ first 24 bits = network portion- Remaining 8 bits = device addresses
- Total addresses = 2⁸ = 256
📌 Important Rule
➕ More bits for network → ➖ fewer devices
➖ Fewer bits for network → ➕ more devices
🧩 VNet vs Subnet
- VNet = Full address space
- Subnet = Smaller range inside the VNet
Example
- VNet → 100.8.0.0/24 → 256 possible IPs
- Subnet → 100.8.0.0/28 → only 16 IPs (2⁴)
🏙️ Think of it like:
City = VNet
Neighborhood = Subnet
🛠️ Creating VNets in Azure
🛠️ Steps to Create a Virtual Network and Subnet in Azure
Follow these steps in the Azure Portal to set up your Virtual Network (VNet) and subnet.
✅ Step 1 – Sign in to Azure Portal
- Open https://portal.azure.com
- Log in with your Azure account
- Click Create a resource from the home page
✅ Step 2 – Locate the Virtual Network Service
- In the search bar, type Virtual Network
- Select Virtual Network from the results
- Click Create
✅ Step 3 – Provide Basic Details
In the Basics tab, enter:
- Subscription – Choose your Azure subscription
- Resource Group – Select existing or create new
- Name – Example:
MyVNet - Region – Choose the closest region
Then click Next: IP Addresses
✅ Step 4 – Configure VNet Address Space
Define the IP range for the whole network.
- Default example:
10.0.0.0/16 - Custom example:
100.8.0.0/24
💡 The address range must not overlap with other VNets or on-prem networks.
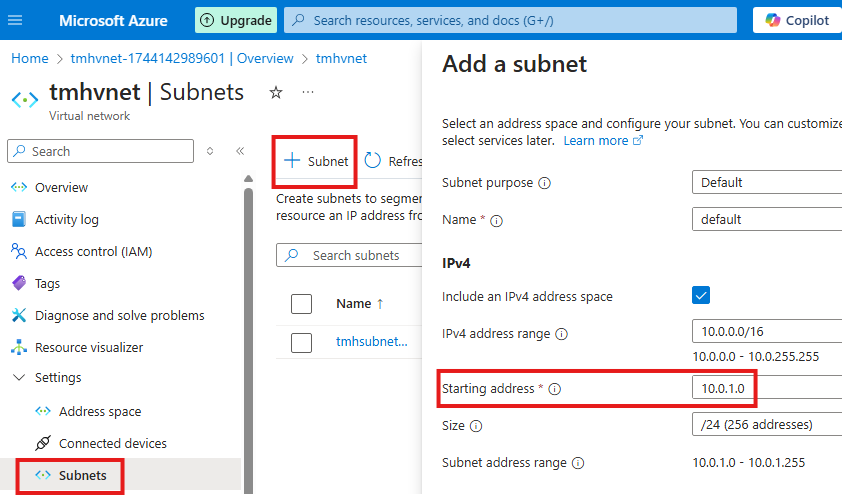
✅ Step 5 – Add a Subnet
- Click Add Subnet
- Enter:
- Subnet name – e.g.,
WebSubnet - Address range – e.g.,
100.8.0.0/28
- Click Add

⚠️ Azure automatically reserves the first 5 IP addresses in every subnet for internal use.
✅ Step 6 – Optional Security Settings
You may enable:
- Azure Firewall
- DDoS Protection
- Bastion Host
These can also be configured later.
Click Next: Tags → then Review + Create
While creating a VNet in the Azure portal you can:
- Choose the address range
- Rename the default subnet
- Add additional subnets
- Let Azure handle non-overlapping ranges
We can add more subnets to an existing virtual network.
⚠️ Azure Reserved IPs
Azure automatically reserves the first 5 IP addresses in every subnet for internal management.
So they cannot be assigned to your VMs.
💡 Example
If subnet starts at 10.0.0.0
→ 10.0.0.0 to 10.0.0.4 are reserved by Azure
🖥️ Adding a Virtual Machine to a VNet
When creating a VM, Azure asks you to select:
- The Virtual Network
- The Subnet
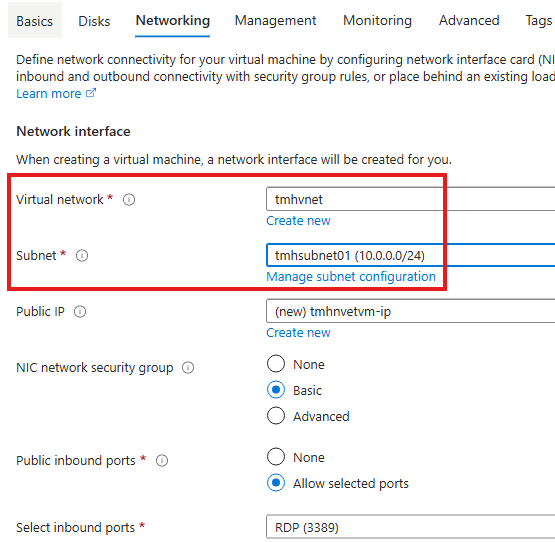
This ensures the VM becomes part of your private cloud network and follows all NSG and routing rules.
🌍 Public IP vs Private IP
🟢 Private IP
- Used for communication inside VNet
- Not reachable from the internet
- Unique within the VNet
🔴 Public IP
- Used for global internet access
- Exposes the resource to external traffic
- Higher security risk
❓ Why Do We Need Both?
To improve security:
- ❌ Block public IP on individual VMs
- ✅ Allow access only through Application Gateway
- 🌐 Only the gateway gets a public IP
🔐 Best Practice
In real environments, all requests should enter via Application Gateway, not directly to VMs.
This minimizes attack surface and gives full control.
🤔 Why Do We Need Azure Virtual Network?
Because in Azure:
- Physical servers are shared
- Multiple subscriptions coexist
- Security and isolation are mandatory
VNet ensures:
- ✅ Organization-level isolation
- ✅ Secure communication
- ✅ Controlled internet exposure
- ✅ Enterprise-grade networking
🚀 Without VNet → open playground
With VNet → secured private fortress
✅ Final Thoughts
Azure Virtual Network is the foundation of cloud networking. Understanding:
- VNets
- Subnets
- CIDR
- NSG
- Application Gateway
- Public vs Private IP
is essential for:
- Azure administration
- AZ-104 certification
- Real-world cloud architecture
You’ve now taken the first step toward mastering Azure networking 💪.
Leave a Reply