Table of Contents
- Terraform Fundamentals: Infrastructure as Code (IaC) for Beginners
- Terraform Providers Explained (Beginner-Friendly)
- Install Terraform in Windows Using PowerShell and Chocolatey(Windows package manager)
- First Terraform Code: Create an Azure Storage Account (Beginner Friendly)
- Terraform State File Management with Azure Storage (Beginner Friendly)
- Terraform Variables Explained
Terraform Fundamentals: Infrastructure as Code (IaC) for Beginners
In this section, we’ll cover the core fundamentals of Terraform and Infrastructure as Code (IaC). If you are completely new to Terraform or cloud automation, this will give you a strong conceptual foundation before we move into hands-on labs in later sections.
What Is Infrastructure as Code (IaC)?
Infrastructure as Code means provisioning and managing infrastructure using code instead of manual steps.
Traditionally, an engineer would log in to a cloud portal (Azure, AWS, or GCP), click through screens, fill forms, and create resources like virtual machines, load balancers, and databases. With IaC, you write code that defines what infrastructure you want, and a tool provisions it for you automatically.
In simple terms:
- You write code
- The code creates infrastructure
- Your infrastructure becomes repeatable, predictable, and automated
This is exactly what tools like Terraform help us achieve.
Popular Infrastructure as Code Tools
There are multiple IaC tools available today:
- Terraform – Cloud-agnostic (works with Azure, AWS, GCP, and more)
- Pulumi – Uses programming languages like Python, TypeScript
- Azure ARM Templates / Bicep – Azure-native IaC tools
- AWS CloudFormation – AWS-native IaC tool
- GCP Deployment Manager – GCP-native IaC tool
In this series, the focus is Terraform, because it works across multiple cloud providers and is widely used in the industry.
Why Do We Need Infrastructure as Code?
You might wonder:
“If I can easily create resources using the cloud portal, why should I write code?”
Let’s understand this with a simple example.
Example: A Basic Three-Tier Architecture
Imagine a simple application setup:
- Web Tier – Handles user requests
- App Tier – Processes business logic
- Database Tier – Stores data
In a real cloud environment, this includes:
- Multiple virtual machines
- Auto-scaling or VM scale sets
- External and internal load balancers
- Health probes and networking
- Highly available databases (primary + replica)
Creating this manually using a cloud portal might take 2 hours for just one environment.
The Real Enterprise Challenge
In real organizations, you don’t have just one environment.
Typically, you have multiple environments like:
- Development (Dev)
- User Acceptance Testing (UAT)
- System Integration Testing (SIT)
- Pre-Production
- Production
- Disaster Recovery (DR)
That’s 6 environments.
If one environment takes 2 hours, manually creating all of them takes 12+ hours — and that’s just for provisioning.
Problems With Manual Infrastructure Provisioning
Manual infrastructure creation introduces several serious challenges:
Time-Consuming
Engineers spend hours just setting up infrastructure instead of developing or testing applications.
High Cost
Resources often remain running even when not in use, increasing cloud bills.
Repetitive Work
The same steps are repeated daily across environments.
Human Errors
Manual clicks and form entries can easily lead to misconfigurations.
Security Issues
Inconsistent role-based access and permissions can expose security risks.
“It Works on My Machine” Problem
Each environment may differ slightly:
- Different software versions
- Missing patches
- Configuration mismatches
This leads to bugs appearing in production even when code works in development.
How Terraform Solves These Problems
Terraform addresses all these challenges effectively.
Automation
- Automatically create, update, and destroy infrastructure
- No manual clicks or repetitive tasks
Consistency
- Same code creates identical environments
- Eliminates configuration drift
Cost Optimization
- Easily destroy infrastructure when not needed
- Avoid paying for unused resources
Faster Delivery
- Provision complex infrastructure in minutes
- Focus more on development and testing
Version Control
- Terraform code is stored in Git
- Full history, reviews, and approvals via pull requests
Reusability
- Write once, deploy many times
- Use variables to create multiple environments from the same code
How Terraform Works (High-Level)
Terraform follows a simple workflow:
Terraform Configuration Files
- Written using
.tffiles - Stored in a Git repository
Key Terraform Commands
- terraform init
Initializes Terraform and downloads required provider plugins - terraform validate
Checks syntax and basic configuration errors - terraform plan
Shows a preview of changes (dry run) - terraform apply
Applies changes and creates/updates infrastructure - terraform destroy
Removes infrastructure when it’s no longer needed
These commands can be run manually or automated using CI/CD pipelines.
Installing Terraform
Terraform installation is straightforward and supports all major operating systems.
Installation Options
- macOS
- Windows
- Linux
- FreeBSD and others
Summary
By the end of this section, you should understand:
- What Infrastructure as Code is
- Why manual infrastructure doesn’t scale
- How Terraform solves real-world enterprise problems
- The basic Terraform workflow
- How to install Terraform on your system
Terraform Providers Explained (Beginner-Friendly)
In this section, we’ll focus entirely on Terraform Providers. Providers are a core building block of Terraform, and understanding them early will make everything else much easier as we move forward.
What Is a Terraform Provider?
A Terraform provider is a plugin that allows Terraform to talk to external systems such as:
- Cloud platforms (Azure, AWS, GCP)
- Container platforms (Kubernetes, Docker)
- Monitoring and tooling platforms (Datadog, Prometheus)
Terraform itself does not know how to create a virtual machine, database, or load balancer.
Instead, it relies on providers to translate Terraform code into API calls that cloud platforms understand.
Terraform Version vs Provider Version
This is a very important concept for beginners.
- Terraform CLI version
This is the version of Terraform installed on your machine (for example,1.9.x). - Terraform provider version
Each provider (Azure, AWS, etc.) has its own version, maintained independently.
👉 These two versions are separate and serve different purposes.
Types of Terraform Providers
Terraform providers are categorized based on who maintains them:
Official Providers
- Maintained by HashiCorp
- Examples: AzureRM, AWS, Google
- Fully supported and widely used
Partner Providers
- Maintained by technology partners
- Examples: Datadog, Docker, Kubernetes integrations
Community Providers
- Maintained by the open-source community
- Useful for niche or emerging platforms
How Terraform Providers Work (Behind the Scenes)
When you run Terraform commands, this is what happens:
- You write Terraform configuration files (
.tf) - Terraform reads the configuration
- The provider plugin:
- Translates your configuration
- Calls the target platform’s API (Azure, AWS, etc.)
- The platform creates or updates resources
- Terraform displays the result
👉 Providers act as a bridge between Terraform and real infrastructure.
Why Providers Are Required
Each platform has:
- Different APIs
- Different authentication methods
- Different resource definitions
Providers standardize this complexity so you can write consistent Terraform code without worrying about API differences.
That’s why Terraform supports hundreds of providers.
Provider Configuration Basics
A Terraform configuration usually includes two key parts:
Terraform Block
This defines:
- Required Terraform version
- Required providers and their versions
Provider Block
This configures how Terraform connects to the platform (credentials, features, regions, etc.)
Example (conceptual, not full code):
- Specify the provider source
- Lock a provider version
- Configure provider-specific settings
Why You Must Lock Provider Versions
If you don’t specify a provider version, Terraform uses the latest version by default.
This can cause problems because:
- New versions may remove or rename fields
- Existing Terraform code may break unexpectedly
Best Practice
- Use the provider version you developed and tested with
- Upgrade versions intentionally, not automatically
This process is called version locking.
Understanding Provider Version Constraints
Terraform allows you to control which versions are allowed using version operators.
Here are the most common ones:
Exact Version (=)
- Uses only one specific version
- No upgrades allowed
Exclude Version (!=)
- Uses any version except the excluded one
Greater Than / Less Than (>=, <=)
- Uses versions based on comparison rules
Pessimistic Constraint (~>) – Most Important
This allows safe updates.
Example behavior:
- Allows patch updates (bug fixes)
- Prevents breaking changes
If your version is:
3.0.2→ allowed:3.0.5- Not allowed:
3.1.0
This keeps your infrastructure stable while still receiving fixes.
When Should You Upgrade a Provider?
Follow this workflow:
- Upgrade the provider locally
- Test all Terraform changes
- Validate nothing breaks
- Promote changes to higher environments
Never upgrade providers directly in production.
Key Takeaways
By the end of this section, you should understand:
- What Terraform providers are
- Why providers are required
- Difference between Terraform and provider versions
- Types of providers
- How providers interact with APIs
- Why version locking is critical
- How version constraints work
Install Terraform in Windows Using PowerShell and Chocolatey(Windows package manager)
Using Chocolatey, a Windows package manager, is one of the easiest ways to install Terraform. It handles downloading, installation, and updates automatically.
Step 1: Install Chocolatey
Chocolatey must be installed first before we can use it to install Terraform.
- Open PowerShell as Administrator
- Run the following command:
Set-ExecutionPolicy Bypass -Scope Process -Force; `
[System.Net.ServicePointManager]::SecurityProtocol = `
[System.Net.ServicePointManager]::SecurityProtocol -bor 3072; `
iex ((New-Object System.Net.WebClient).DownloadString('https://community.chocolatey.org/install.ps1'))
This command temporarily bypasses the execution policy and installs Chocolatey securely.
Note: Close and reopen PowerShell after installation to ensure Chocolatey is available.
Step 2: Install Terraform
Once Chocolatey is installed, run the command below to install Terraform:
choco install terraform -y
The -y flag automatically confirms prompts and installs the latest stable version.
Step 3: Verify the Installation
To confirm that Terraform has been installed successfully, run:
terraform -version
If Terraform displays its version number, the installation is complete ✅
Summary
Using Chocolatey simplifies the installation process by:
- Eliminating manual downloads
- Automatically configuring the system PATH
- Making future updates easy with a single command
You’re now ready to start working with Terraform 🚀
First Terraform Code: Create an Azure Storage Account (Beginner Friendly)
In this section, we’ll write and run our first Terraform Infrastructure as Code (IaC) to create an Azure Storage Account.
This is written for absolute beginners—no prior Terraform knowledge assumed.
We will:
- Discover the correct Terraform resource
- Write Terraform code step by step
- Authenticate Terraform with Azure
- Understand what each Terraform command does
- Create and clean up Azure resources safely
Finding the Right Terraform Resource
When working with Terraform, the official documentation is your best friend.
Search in Google:
Create Azure Storage Account using Terraform
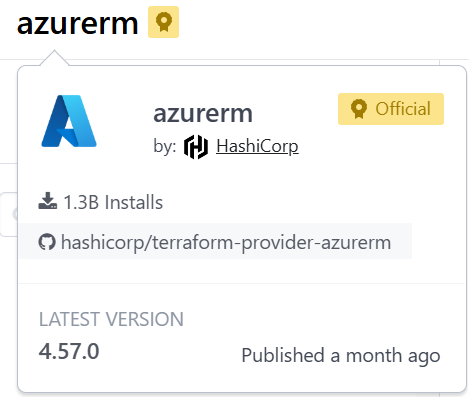
You’ll land on the Terraform Registry page for the Azure Storage Account resource.
https://registry.terraform.io/providers/hashicorp/azurerm/latest/docs/resources/storage_account
This page tells us:
- The resource name:
azurerm_storage_account - Which provider it belongs to:
azurerm - Required and optional arguments
You’ll also notice a tag called Official.
This means the provider is maintained by HashiCorp and is safe to use.
Writing Terraform Code in VS Code
Terraform code is written in HCL (HashiCorp Configuration Language).
To make life easier:
- Install VS Code
- Install the HashiCorp Terraform extension
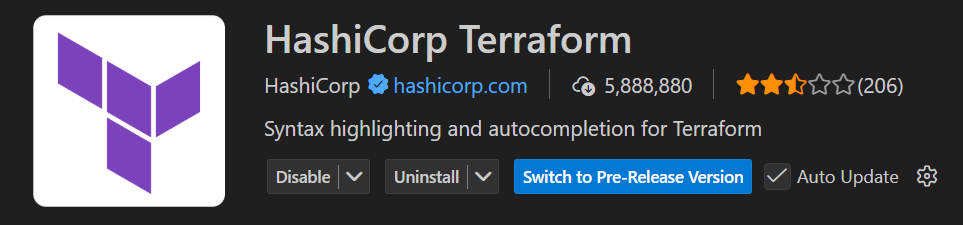
This extension provides:
- Auto-completion
- Syntax highlighting
- Inline documentation
Terraform Configuration Block
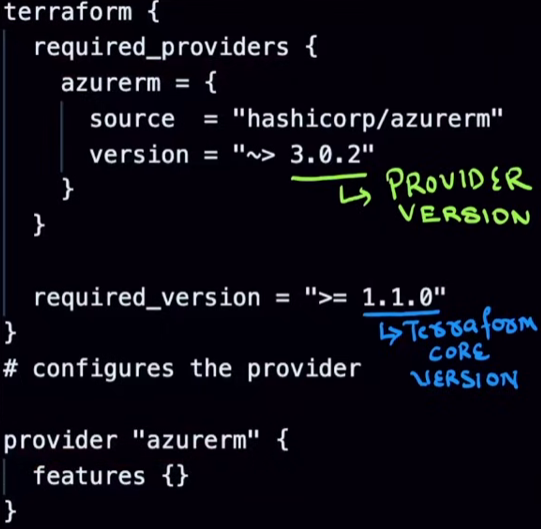
terraform {
  required_version = ">= 1.9.0"

  required_providers {
    azurerm = {
      source  = "hashicorp/azurerm"
      version = "~> 4.8.0"
    }
  }
}
Explanation (line by line):
terraform {}→ Root configuration blockrequired_version→ Ensures Terraform CLI version compatibilityrequired_providers→ Tells Terraform which providers to downloadsource→ Official Azure provider~> 4.8.0→ Allows patch updates but avoids breaking changes
Azure Provider Configuration
provider "azurerm" {
  features {}
}
Explanation:
provider "azurerm"→ Configures Azure Resource Managerfeatures {}→ Mandatory block (even if empty)- Authentication is not written here (handled via environment variables)
Creating an Azure Resource Group
resource "azurerm_resource_group" "example" {
  name     = "example-resources"
  location = "West Europe"
}
Explanation:
resource→ Declares infrastructureazurerm_resource_group→ Resource type"example"→ Local Terraform namename→ Azure resource namelocation→ Azure region
Creating an Azure Storage Account
resource "azurerm_storage_account" "example" {
  name                     = "mytmhstorageaccount10021"
  resource_group_name      = azurerm_resource_group.example.name
  location                 = azurerm_resource_group.example.location
  account_tier             = "Standard"
  account_replication_type = "GRS"

  tags = {
    environment = "staging"
  }
}
Explanation:
resource_group_name→ References the resource group dynamicallylocation→ Reuses the resource group locationaccount_tier→ Storage performance tieraccount_replication_type→ Data replication strategytags→ Metadata for organization and cost tracking
Terraform automatically understands dependencies from these references.
Authenticating Terraform with Azure
Terraform must authenticate before creating resources.
First, log in using Azure CLI:
az login
This opens a browser and authenticates you.
Using a Service Principal (Best Practice)
Instead of deploying using your personal account, we create a Service Principal.
az ad sp create-for-rbac -n az-demo --role="Contributor" --scopes="/subscriptions/$SUBSCRIPTION_ID"
Explanation:
create-for-rbac→ Creates an identity for automationContributor→ RBAC role that allows resource creation--scopes→ Limits access to one subscription
Azure returns credentials like:
{
  "appId": "...",
  "password": "...",
  "tenant": "..."
}
These values are required by Terraform.
Setting the Azure Subscription (If needed)
Ensure Terraform uses the correct subscription, the Azure CLI is using (or else set to desired subscription):
az account set --subscription <subscription-id>
Storing Credentials in PowerShell (Windows)
On Windows, we store credentials as environment variables.
Create a file called env.ps1:
$env:ARM_CLIENT_ID=""
$env:ARM_CLIENT_SECRET=""
$env:ARM_SUBSCRIPTION_ID=""
$env:ARM_TENANT_ID=""
Run it:
.\env.ps1
Important concepts:
- Environment variables are not referenced in
.tffiles - The Azure provider automatically reads them
- This keeps secrets out of code
- When Terraform runs, the provider internally does something like:
“Ifsubscription_idis not set in the provider block, checkARM_SUBSCRIPTION_ID.”
Initializing Terraform
terraform init
1. Downloads the Azure Provider
Terraform reads the required_providers block and downloads the AzureRM provider specified in your configuration.
This provider is responsible for:
- Communicating with Azure APIs
- Creating, updating, and deleting Azure resources
2. Creates the .terraform Directory
Terraform creates a hidden directory named:
.terraform/
This directory contains:
- Provider binaries (for Windows, these are
.exefiles) - Metadata Terraform needs to interact with the provider
These binaries are platform-specific, which is why this folder should never be committed to GitHub.
3. Generates terraform.lock.hcl
Terraform creates a file called:
terraform.lock.hcl
✅ This file locks provider versions
What this file actually does:
- Records the exact provider versions used
- Ensures everyone running the project uses the same provider versions
- Prevents unexpected changes due to provider upgrades
This guarantees consistent and repeatable builds across machines and environments.
Validating Configuration
terraform validate
This checks:
- Syntax correctness
- Required arguments
- Logical errors
No resources are created at this stage.
How Terraform Reads .tf Files
When Terraform runs:
- It loads all
.tffiles in the directory - Treats them as one single configuration
- File order does not matter
Planning the Infrastructure Changes
terraform plan
This command:
- Compares desired state vs actual state
- Shows what Terraform will do
- Makes no changes
Example output summary:
Plan: 2 to add, 0 to change, 0 to destroy.
Filtering Plan Output (PowerShell)
To see only created resources:
terraform plan | Select-String "will be created"
This is the PowerShell equivalent of grep.
Applying the Configuration
terraform apply
Terraform:
- Shows the plan again
- Asks for confirmation
- Creates the resources in Azure
Making Changes Later
Terraform follows desired state:
- Modify
.tffiles - Run
terraform plan - Apply changes
Some changes require resource recreation, which Terraform clearly shows.
Cleaning Up Resources (Recommended)
Instead of manually deleting resources:
terraform destroy
To skip confirmation:
terraform destroy --auto-approve
This ensures:
- Clean teardown
- No orphaned resources
- No unexpected cloud costs
Key Takeaways
- Terraform code defines desired state
- Providers read credentials automatically from environment variables
planshows changes,applyexecutes them- All
.tffiles in a folder act as one configuration destroyis the safest cleanup method
This completes your first real Terraform IaC workflow 🎉
Terraform State File Management with Azure Storage (Beginner Friendly)
In this section, we will understand what the Terraform state file is, why it is critical, and how to manage it safely using Azure Storage as a remote backend.
This is a core concept in Terraform, and understanding it early will save you from many production issues later.
What Is the Terraform State File?
When you run Terraform for the first time, it automatically generates a file called:
terraform.tfstate
This file contains the actual current state of your infrastructure.
Terraform uses this file to:
- Know what resources already exist
- Compare current state with desired state
- Decide what changes to make
Why Terraform Needs a State File
In your Terraform code (.tf files), you only describe the desired state, for example:
“I want one resource group and one storage account.”
But Terraform also needs to know:
- What already exists
- What was created earlier
- What needs to change
This information comes entirely from the state file.
Without the state file:
- Terraform cannot track resources
- It may try to recreate everything
- It may lose control of your infrastructure
Important Rules About the State File
The Terraform state file is extremely sensitive.
Follow these rules strictly:
- Never modify it manually
- Always back it up
- Protect it like a secret
- Do not share it publicly
Best Practices for Managing Terraform State
Do Not Store State Locally
By default, Terraform stores terraform.tfstate in your local folder.
This is fine for learning, but not for real projects.
Instead, store it in a remote backend, such as:
- Azure Blob Storage
- AWS S3
- Google Cloud Storage
This allows:
- Team collaboration
- Centralized access
- Better security
- Reliable recovery
Use State Locking
State locking ensures:
Only one Terraform process can modify infrastructure at a time.
This prevents:
- Two engineers applying changes simultaneously
- Corrupted state files
- Race conditions
Azure Storage supports native state locking, which Terraform uses automatically.
Isolate State Files for Each Environment
Never use one state file for all environments.
Best practice:
- One state file per environment
Example:
dev.tfstateqa.tfstateprod.tfstate
This ensures:
- Changes in dev do not affect production
- Clean separation of infrastructure
Keep Regular Backups
Even with remote backends:
- Accidental deletion
- Corruption
- Misconfiguration can happen
Always ensure your backend supports:
- Versioning
- Soft delete
- Backups
Azure Blob Storage supports all of these.
Why We Use Azure Storage for Terraform State
Azure Blob Storage is commonly used because:
- It is secure
- Highly available
- Supports state locking
- Supports versioning and backups
- Integrates well with Terraform
Importantly:
This storage account is NOT managed by Terraform
It is created and maintained separately.
This avoids circular dependency issues.
Creating the Remote Backend Infrastructure
We do NOT use Terraform to create the backend storage.
Instead, we use:
- Azure Portal
- or Azure CLI
This ensures Terraform can safely access the backend from the start.
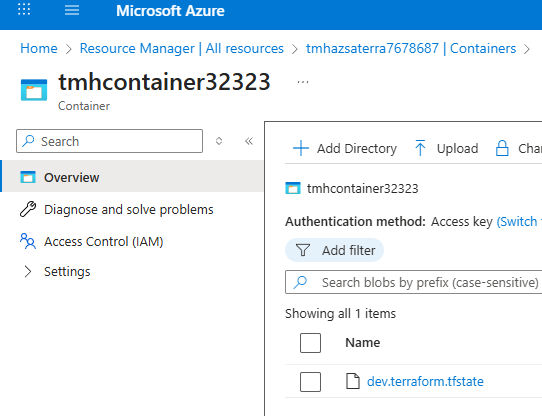
What we create:
- A resource group
- A storage account
- A blob container
This container will hold the Terraform state file remotely.
Configuring Terraform to Use Azure Backend
Google search: Azure backend terraform, to find a page about how to configure remote backend in terraform
https://developer.hashicorp.com/terraform/language/backend/azurerm
Once the storage account and blob container exist, we must tell Terraform:
“Use this location for storing state instead of local files.”
To do this, we add a backend block inside the terraform block.
Example:
terraform {
  backend "azurerm" {
    resource_group_name  = "tfstate-rg"
    storage_account_name = "tfstateaccount123"
    container_name       = "tfstate"
    key                  = "prod.terraform.tfstate"
  }
}
Explanation (Line by Line)
backend "azurerm"
Tells Terraform to use Azure Storage as backendresource_group_name
The resource group where the storage account existsstorage_account_name
The Azure storage account holding the statecontainer_name
Blob container where the state file will be storedkey
The name of the state file inside the container
(This allows multiple environments to coexist)
How Terraform Authenticates to Azure Storage
Terraform uses:
- Azure CLI authentication
OR - Environment variables (
ARM_CLIENT_ID, etc.)
The same authentication you use for Azure resources is reused for backend access.
What Happens After Backend Is Configured
After adding the backend block, run:
terraform init
Terraform will:
- Connect to Azure Storage
- Create the state file remotely
- Migrate local state (if any)
- Enable locking automatically
You will now see:
- A minimal local state file
- The real state stored securely in Azure Blob Storage
Why Remote State Is Critical
Without remote state:
- Teams cannot collaborate safely
- Infrastructure can drift
- State can be lost or corrupted
- CI/CD pipelines cannot function properly
With remote state:
- Terraform becomes production-ready
- Safe team operations are possible
- Infrastructure remains predictable
Key Takeaways
- Terraform state file tracks actual infrastructure
- Never modify or expose it manually
- Always use a remote backend for real projects
- Azure Blob Storage is a reliable backend choice
- State locking and isolation are mandatory for safety
Terraform Variables Explained
In this section, we’ll learn about Terraform Variables, one of the most important concepts for writing reusable and flexible Infrastructure as Code.
Variables help you avoid hardcoding values and make your Terraform configurations adaptable to different environments like dev, staging, and production.
Types of Variables in Terraform
Terraform supports three main kinds of variables:
Input Variables
These allow you to pass values into Terraform from outside (CLI, files, etc.).
Output Variables
These allow Terraform to return values after execution, such as resource names, IP addresses, or IDs.
Local Variables
These are used inside Terraform code only for convenience and readability.
Type Constraints in Terraform
Terraform supports several data types:
Primitive Types
- string – text values
- number – numeric values
- bool – true or false
These take only one value.
Collection Types
- list – ordered collection of values
- set – unordered unique values
- map – key-value pairs
Structural Types
- object – complex structure with named attributes
- tuple – fixed sequence of values
Special Type
- any – use when you don’t know the type in advance (not recommended for beginners unless necessary)
Input Variables
Input variables allow your Terraform code to be dynamic and reusable.
Defining an Input Variable
variable "environment" {
  type        = string
  description = "env var"
  default     = "staging"
}
Line-by-line Explanation
variable "environment"
Defines a variable namedenvironmenttype = string
This variable must be a string valuedescription = "env var"
Human-readable explanation of what this variable is fordefault = "staging"
If no value is provided, Terraform will use"staging"
Using a Variable in Terraform Code
tags = {
  environment = var.environment
}
Line-by-line Explanation
tags = { ... }
Creates a tag block (commonly used in cloud resources)environment = var.environment
Assigns the value of theenvironmentvariable to the tagvar.environmentmeans “use the variable named environment”
Why Using Defaults Is Not Always Recommended
Using a default value makes the variable optional, but:
- It can hide mistakes
- It reduces flexibility
- It may lead to accidental deployments with wrong values
For real projects, it’s better to explicitly pass values.
Assigning Input Variables
Terraform allows multiple ways to assign values to variables.
Passing Variables via CLI
terraform plan -var=environment=dev
Explanation
terraform plan
Previews what Terraform will create or modify-var=environment=dev
Assigns the value"dev"to the variableenvironment
⚠️ This overrides the default value and has higher precedence.
Assigning Variables Using a File (terraform.tfvars)
Create a file named terraform.tfvars and write:
environment = "demo"
Explanation
environment = "demo"
Assigns"demo"to theenvironmentvariable
Terraform automatically reads this file when executing commands.
⚠️ Note: CLI assignment still has higher precedence than tfvars files.
Variable Precedence in Terraform
Terraform decides which value to use based on a priority order:
From highest to lowest:
- CLI options (
-var,-var-file) and variables from Terraform Cloud *.auto.tfvarsor*.auto.tfvars.jsonfilesterraform.tfvars.jsonterraform.tfvars- Environment variables
defaultvalue in variable block
This ensures that explicit user input always wins over defaults.
📚 More details:
https://developer.hashicorp.com/terraform/language/values/variables
Output Variables
Output variables let Terraform display useful values after execution.
Defining an Output Variable
output "storage_account_name" {
  value = azurerm_storage_account.example.name
}
Line-by-line Explanation
output "storage_account_name"
Declares an output variable namedstorage_account_namevalue = azurerm_storage_account.example.name
Extracts the name of the storage account created in Terraform
(azurerm_storage_account.examplerefers to a resource defined elsewhere)
Why Output Variables Are Useful
They help you:
- See created resource details
- Pass values between Terraform modules
- Use outputs in scripts or pipelines
You can view outputs using:
terraform output
Or also after:
terraform plan
terraform refresh
Local Variables
Local variables are used for internal convenience when values do not change frequently.
They improve:
- Readability
- Maintainability
- Reusability
Defining Local Variables
locals {
  common_tags = {
    environment = "dev"
    lob         = "banking"
    stage       = "alpha"
  }
}
Line-by-line Explanation
locals { ... }
Declares a block for local variablescommon_tags = { ... }
Defines a map namedcommon_tagsenvironment = "dev"
Sets the environment taglob = "banking"
Line of business tagstage = "alpha"
Deployment stage tag
Using Local Variables in Code
environment = local.common_tags.environment
Explanation
local.common_tags.environment
Accesses theenvironmentfield inside thecommon_tagslocal variable
This avoids repeating the same values in multiple places.
Summary
In this section, you learned:
- The three types of Terraform variables: input, output, local
- Terraform data types and constraints
- How to define and use input variables
- Multiple ways to assign variable values
- Variable precedence rules
- How output variables expose resource information
- How local variables simplify code and reduce duplication