Table of Contents
- What We Are Building (End Architecture Overview)
- Step 1: Resource Group, Virtual Network, and Subnet
- Step 2: Network Security Group (NSG)
- Step 3: Public IP (Inbound Traffic)
- Step 4: Load Balancer and Backend Pool
- Step 5: Health Probe and Load Balancing Rule
- Step 6: NAT Gateway (Outbound Traffic)
- Step 7: Virtual Machine Scale Set (VMSS)
- Step 8: Add Autoscaling (Last Step)
- Step 8.1: Add a Scale-Out Rule (CPU > 80%)
- Step 8.2: Add a Scale-In Rule (CPU < 10%)
- Step 8.3: Apply and Verify
- How to Test Autoscaling (Optional but Powerful)
- Final Result
- Why This Project Is Important for Beginners
This mini project demonstrates how to build a real-world Azure infrastructure step by step using Terraform.
The goal is not just to deploy resources, but to understand why each Azure service exists, how it fits into the architecture, and what each Terraform block actually does.
Instead of creating everything in one go, we intentionally build the infrastructure incrementally. This makes it easier for beginners to:
- Verify resources in the Azure Portal
- Understand dependencies between services
- Debug errors without feeling overwhelmed
- Build a strong mental model of Azure networking and compute
What We Are Building (End Architecture Overview)
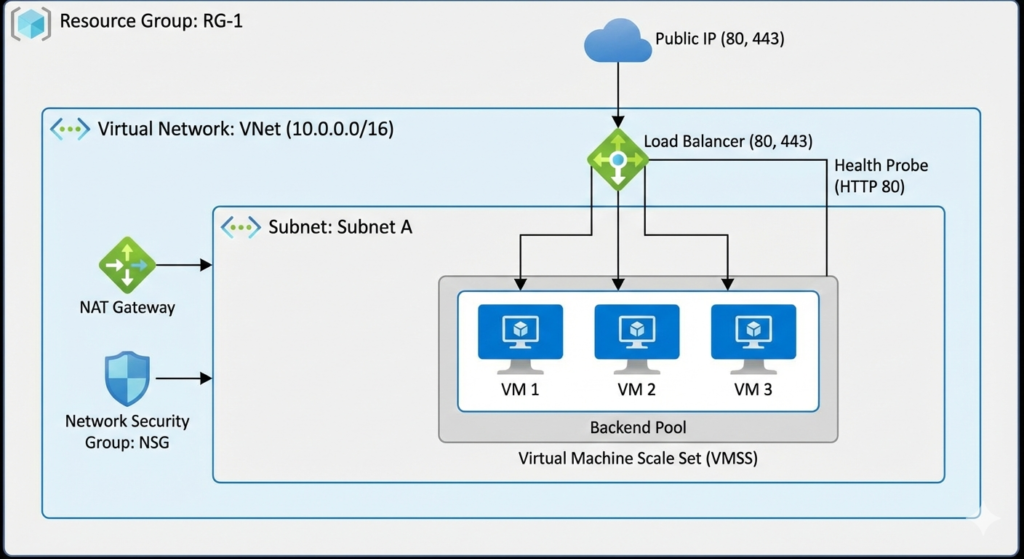
By the end of this project, we will have:
- A Resource Group to logically contain all resources
- A Virtual Network (VNet) with a defined private IP space
- A Subnet to host compute resources
- A Network Security Group (NSG) acting as a firewall
- A Public IP for inbound internet access
- A Standard Load Balancer to distribute traffic
- A NAT Gateway to manage outbound internet traffic
- A Virtual Machine Scale Set (VMSS) running a web application
This architecture closely resembles how production web applications are deployed on Azure.
Step 1: Resource Group, Virtual Network, and Subnet
Why this step is required
In Azure, nothing can exist without a Resource Group.
Similarly, no virtual machine can exist outside a Virtual Network.
This step lays the networking foundation for everything that follows.
Resource Group (rg.tf)
resource "azurerm_resource_group" "rg" {
  name     = "rgminipro345"
  location = "Central US"
}
Explanation:
azurerm_resource_group
Creates a logical container for Azure resources.name
Used for management, billing, and cleanup.location
Determines the Azure region where resources are deployed.
After applying, this can be verified in:
Azure Portal → Resource Groups
Virtual Network (vnet.tf)
resource "azurerm_virtual_network" "vnet" {
  name                = "vnetminipro8979879"
  address_space       = ["10.0.0.0/16"]
  location            = azurerm_resource_group.rg.location
  resource_group_name = azurerm_resource_group.rg.name
}
Explanation:
address_spacedefines the private IP range for the entire VNet.10.0.0.0/16provides ~65,536 private IPs.- VNets are isolated by default and cannot access the internet without configuration.
Subnet
resource "azurerm_subnet" "subnet" {
  name                 = "subnetminipro89"
  resource_group_name  = azurerm_resource_group.rg.name
  virtual_network_name = azurerm_virtual_network.vnet.name
  address_prefixes     = ["10.0.0.0/20"]
}
Explanation:
- Subnets divide a VNet into smaller IP ranges.
/20provides ~4,096 IPs.- This subnet will host:
- VM Scale Set instances
- NAT Gateway association
- Network interfaces
At this point, the subnet has no security rules applied.
Step 2: Network Security Group (NSG)
Why NSGs are needed
A Network Security Group (NSG) is Azure’s primary network firewall.
It controls what traffic is allowed or denied at the subnet or NIC level.
NSG Definition (nsg.tf)
resource "azurerm_network_security_group" "nsg" {
  name                = "nsgminipro76786"
  location            = azurerm_resource_group.rg.location
  resource_group_name = azurerm_resource_group.rg.name
This creates an empty firewall that we populate with rules.
Security Rules
security_rule {
  name                       = "allow-http"
  priority                   = 100
  direction                  = "Inbound"
  access                     = "Allow"
  protocol                   = "Tcp"
  destination_port_range     = "80"
}
What this rule means:
- Allows inbound HTTP traffic
- Uses TCP protocol
- Priority determines evaluation order (lower number = higher priority)
Similar rules are added for HTTPS (443) and SSH (22).
⚠️ SSH is allowed here for learning purposes only.
Associating NSG with Subnet
resource "azurerm_subnet_network_security_group_association" "myNSG" {
  subnet_id                 = azurerm_subnet.subnet.id
  network_security_group_id = azurerm_network_security_group.nsg.id
}
Why this matters:
- NSGs do nothing unless attached.
- Subnet-level attachment applies rules to all resources inside the subnet.
Verify in:
Azure Portal → VNet → Subnets
Step 3: Public IP (Inbound Traffic)
Why a Public IP is required
To expose an application to the internet, Azure requires a Public IP resource.
resource "azurerm_public_ip" "pubip" {
  allocation_method = "Static"
  sku               = "Standard"
  zones             = ["1", "2", "3"]
}
Key points:
- Static IP does not change
- Standard SKU is required for Standard Load Balancer
- Zone-redundant for high availability
- Used only for inbound traffic
Step 4: Load Balancer and Backend Pool
Why a Load Balancer is needed
The Load Balancer distributes incoming traffic across multiple VMs, enabling:
- High availability
- Fault tolerance
- Horizontal scaling
Load Balancer
resource "azurerm_lb" "lb" {
  sku = "Standard"
Frontend IP Configuration
frontend_ip_configuration {
  public_ip_address_id = azurerm_public_ip.pubip.id
}
This connects the public IP to the Load Balancer frontend.
Backend Pool
resource "azurerm_lb_backend_address_pool" "bpool" {
  loadbalancer_id = azurerm_lb.lb.id
}
VMSS instances will later register here automatically.
Step 5: Health Probe and Load Balancing Rule
Health Probe
resource "azurerm_lb_probe" "lbprobe" {
  protocol = "Http"
  port     = 80
}
Azure uses this probe to determine VM health.
Load Balancing Rule
resource "azurerm_lb_rule" "lbrule" {
  frontend_port = 80
  backend_port  = 80
  probe_id      = azurerm_lb_probe.lbprobe.id
}
Defines how traffic flows from the frontend to backend VMs.
Step 6: NAT Gateway (Outbound Traffic)
Why NAT Gateway is needed
Inbound and outbound traffic should be separated.
- Load Balancer → inbound
- NAT Gateway → outbound
resource "azurerm_nat_gateway" "natgw" {}
Associated with:
resource "azurerm_subnet_nat_gateway_association" "example" {
  subnet_id = azurerm_subnet.subnet.id
}
All outbound traffic from the subnet now uses a fixed public IP.
Step 7: Virtual Machine Scale Set (VMSS)
Why VMSS is used
VMSS allows:
- Running multiple identical VMs
- Automatic scaling
- Seamless Load Balancer integration
SSH Authentication
disable_password_authentication = true
admin_ssh_key {
  public_key = file(".ssh/key.pub")
}
- Passwords are disabled
- SSH key authentication is enforced
- Keys are injected at creation time
Network Integration
load_balancer_backend_address_pool_ids = [
  azurerm_lb_backend_address_pool.bpool.id
]
Automatically registers VM instances with the Load Balancer.
user-data.sh (Cloud Init)
The startup script:
- Installs Apache and PHP
- Deploys a test application
- Displays instance metadata
Every VM runs this script on first boot.
Step 8: Add Autoscaling (Last Step)
Finally, add autoscale.tf.
Apply.
What is happening here?
- Autoscale profile is created
- VMSS can scale between 1 and 10 instances
Verify
- Open VMSS
- Go to Scaling
- Confirm autoscale rules exist
Step 8.1: Add a Scale-Out Rule (CPU > 80%)
Add this inside the same profile {} block:
rule {
  metric_trigger {
    metric_name        = "Percentage CPU"
    metric_resource_id = azurerm_orchestrated_virtual_machine_scale_set.vmss.id
    time_grain         = "PT1M"
    statistic          = "Average"
    time_window        = "PT5M"
    time_aggregation   = "Average"
    operator           = "GreaterThan"
    threshold          = 80
  }

  scale_action {
    direction = "Increase"
    type      = "ChangeCount"
    value     = "1"
    cooldown  = "PT5M"
  }
}
Line-by-line explanation (beginner friendly)
- Percentage CPU → Azure’s built-in VMSS CPU metric
- PT1M → Check CPU every 1 minute
- PT5M → Evaluate average over 5 minutes
- GreaterThan 80 → Trigger when CPU > 80%
- Increase by 1 → Add one VM
- Cooldown 5 min → Prevent rapid scaling
Step 8.2: Add a Scale-In Rule (CPU < 10%)
Add this below the scale-out rule:
rule {
  metric_trigger {
    metric_name        = "Percentage CPU"
    metric_resource_id = azurerm_orchestrated_virtual_machine_scale_set.vmss.id
    time_grain         = "PT1M"
    statistic          = "Average"
    time_window        = "PT5M"
    time_aggregation   = "Average"
    operator           = "LessThan"
    threshold          = 10
  }

  scale_action {
    direction = "Decrease"
    type      = "ChangeCount"
    value     = "1"
    cooldown  = "PT5M"
  }
}
What this does
- If CPU stays below 10% for 5 minutes
- Azure removes one VM
- But never below your
minimum = 1
Step 8.3: Apply and Verify
Run:
terraform plan
terraform apply
Then go to:
Azure Portal → VM Scale Set → Scaling → JSON
You should now see:
- ✅
rulesarray populated - ✅
minimum = 1,maximum = 10 - ✅ Autoscale logic visible in UI
How to Test Autoscaling (Optional but Powerful)
To actually see autoscaling happen:
- SSH into one VM using NAT rule
- Generate CPU load:
sudo apt install stress -y stress --cpu 2 --timeout 600 - Wait ~5–10 minutes
- Watch VMSS instance count increase
Final Result
Access the application using:
http://<load-balancer-public-ip>/index.php
Traffic is:
- Load balanced
- Secured by NSG
- Scaled via VMSS
- Outbound traffic controlled by NAT Gateway
Why This Project Is Important for Beginners
This project teaches:
- Core Azure networking concepts
- Secure traffic flow design
- Stateless compute patterns
- Infrastructure-as-Code fundamentals
If you understand this setup, you understand how most Azure web platforms are built.
Leave a Reply